There are so many steps involved in learning how to think like a programmer. For a beginner, what’s important is not the specifics of a language (called the syntax). Rather it’s better to understand the commonalities between languages which are the building blocks of any programming language. These LEGO mazes, which can be solved with “code” using paper rather than a computer, illustrate 4 levels of difficulty and include a variety of programming concepts. While these Levels will be described in more detail below, here is a quick overview:
Level 1: The child can see the specific problem at hand and step by step walk their LEGO figure out of the maze. Like the game Robot Turtles, this easiest level teaches the child to think from a point of reference different than their own. The child’s left may not be the same as the figure-in-the-maze’s left, but even the youngest kids can learn this valuable skill of switching reference frame.
Level 2: Hopefully, by the time they’ve mastered Level 1, your child will realize that it’s a bit tedious to tell the character to move forward 7 times in a row. Rather, it would be handy to just have a way to say “Do this next command 7 times.” This level introduces the concept of “for loops.”
Level 3: Older children might be ambitious enough at this point to realize that an awful lot of work goes into solving a specific maze using the method of Levels 1 and 2. With the introduction of “while loops” and “if statements”, kids can challenge themselves to write as short a program as possible to solve a specific maze. The programmer just needs to consider all possibilities at any random location for their LEGO figure and decide the best generic sequence of actions. For example, what should the character do if there’s an opening to their left? What if they’ve hit a dead end?
Level 4: While kids will hopefully experience success in Level 3, they will likely find that if they try to use their code on a different maze, it may not work. It’s possible that their figure will get stuck in what programmers call an “infinite loop”, repeating the same behaviour over and over again without being able to escape. By introducing a random number generator, older kids can write a program that can get their figure out of any maze.
At the end of this process, the most mature pupils will realise that it would be great if their LEGO figure could remember where he had already been so that he could systematically cover ground instead of seeming to wander aimlessly. This could motivate a discussion of more advanced programming concepts such as memory and stored variables.
Age Range: KS1 /FP and KS2
Time Required: 1 hour if laminating
Difficulty: Easy to prepare, Level 3 and 4 challenges may only be appropriate for KS2
Cost: Free printable, less than £2 to laminate (does not include cost of LEGO or DUPLO bricks which are optional)
Materials:
- Paper for printing Coding a LEGO Maze free printable
- Thermal laminating pouches
Supplies & Tools:
- Thermal laminator
- Scissors
- Paper cutter (optional)
- LEGO figure (or other figure of similar size)
- LEGO or DUPLO bricks (optional)
Instructions:
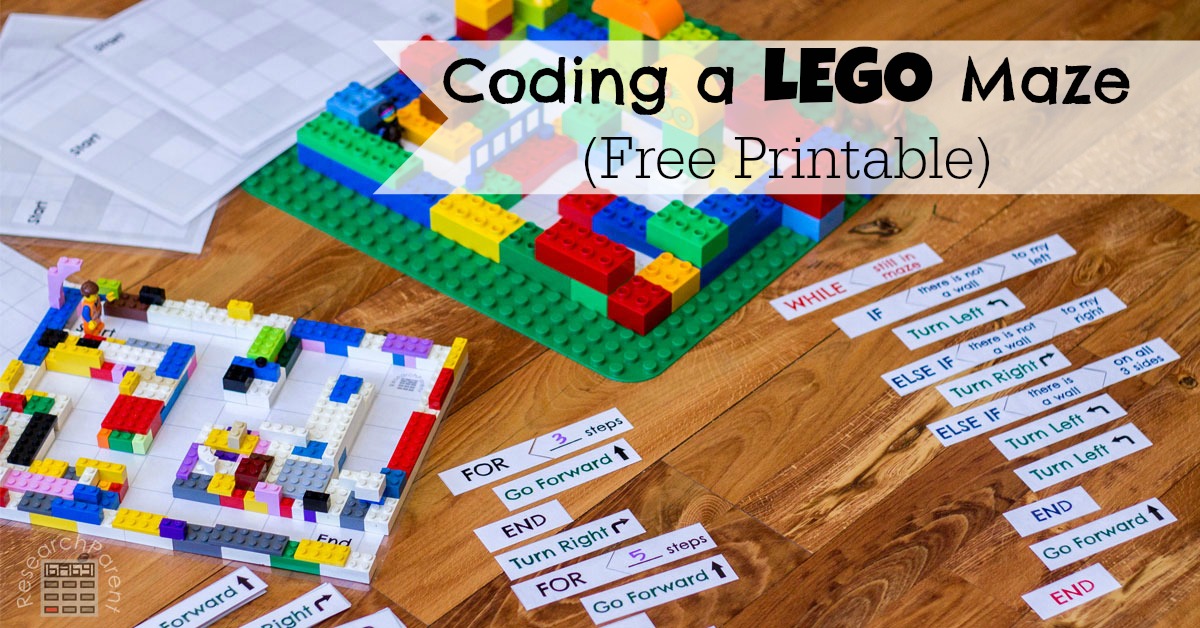
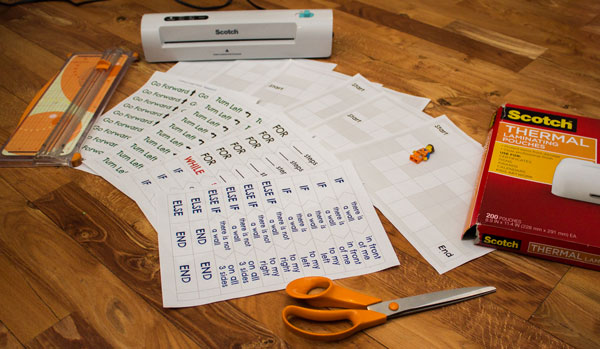
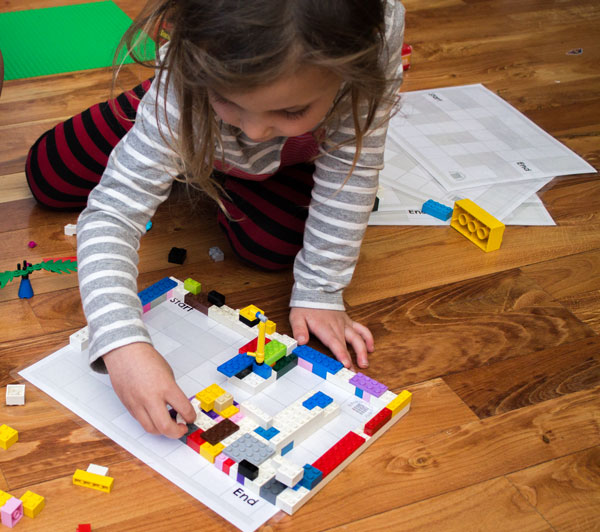
- The first time only, you will need to print, laminate (optional, but recommended), and cut out all the pieces in the Coding a LEGO Maze free printable.
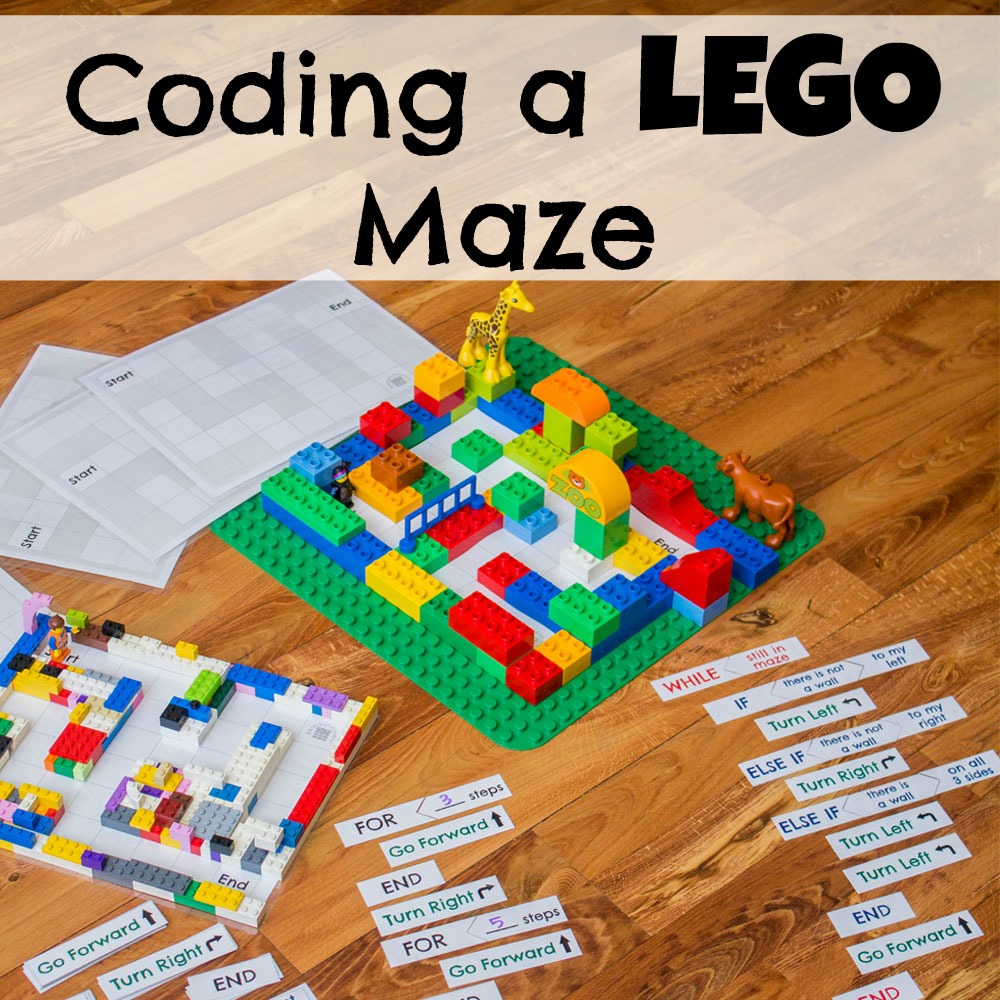
- Next you will need to set up your maze. You can use any of the 5 provided mazes or if you choose, you can make your own maze with the blank grid provided. Once you’ve selected your maze, there are 3 options for setup:
Option 1: If you do not have LEGO of DUPLO pieces or if you would just rather save time, you can use the provided mazes as-is. You just need a figure to place on your maze that has a front, so that you know which way it is facing.
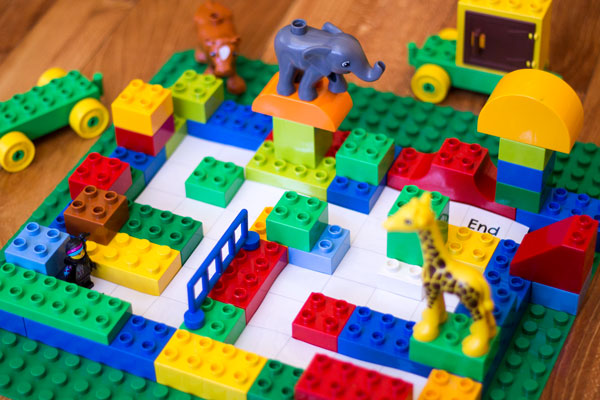
Option 2: If you are a fan of LEGO, you can cover the gray parts of the provided mazes with LEGO bricks.
Option 3: If you are a fan of DUPLO, I recommend cutting out the white part of the maze, placing it on a DUPLO board and then covering the board with DUPLO bricks to form the walls. You could also just place the DUPLO pieces directly on the laminated maze, but I found that didn’t work very well as the walls needed to be pretty high in order to have all the pieces connected together, which makes it hard to move the figure.

Once you’re finished, your maze might look something like this:

Or this:
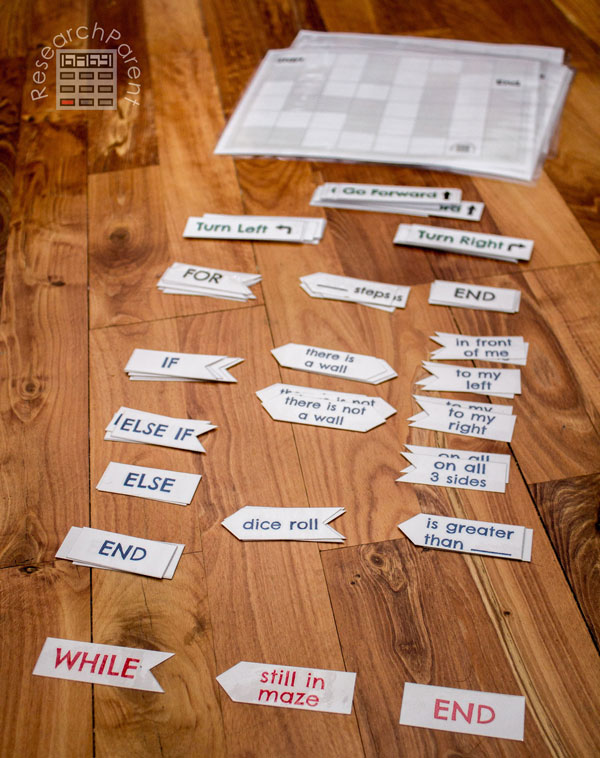
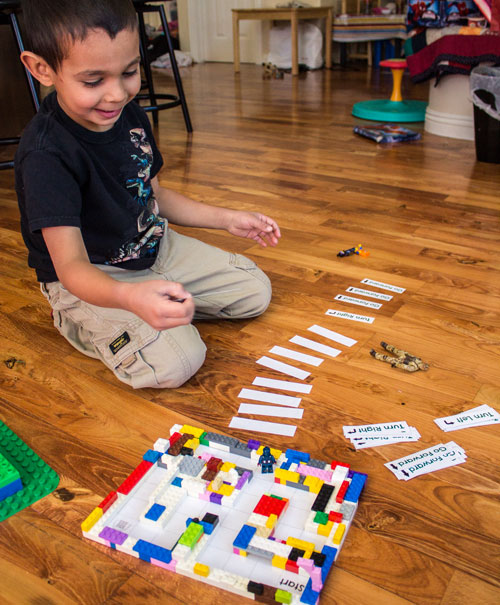
- Level 1: The first step for youngest kids is to teach them how to think from the point of view (reference frame) of the character in the maze. To do this, place the figure at the start of the maze and give your child all the green cards in 3 piles (Go Forward, Turn Right, and Turn Left). Your child needs to place the instructions that he or she thinks the character needs to follow into a long list. For example, in the LEGO (not DUPLO) maze above, Bob the Builder needs to: Go Forward, Go Forward, Go Forward, Turn Right, Go Forward, etc. I had my 6 year olds place all the cards they thought they would need to get Emmet out of the maze into a list. I was planning to move the figure myself using the “code” they had written, but they really wanted to move his character themselves. I had him follow each command one at a time and flip over the cards as he executed them. This worked well. My only caution is that you should pay attention to left and right turns. When Bob was walking toward them, children often placed a Turn Right card when really they needed a Turn Left. When they got to that card as they were flipping them over, I had them place the card in Bob’s hands to show him his mistake. They caught on and fixed it right away.
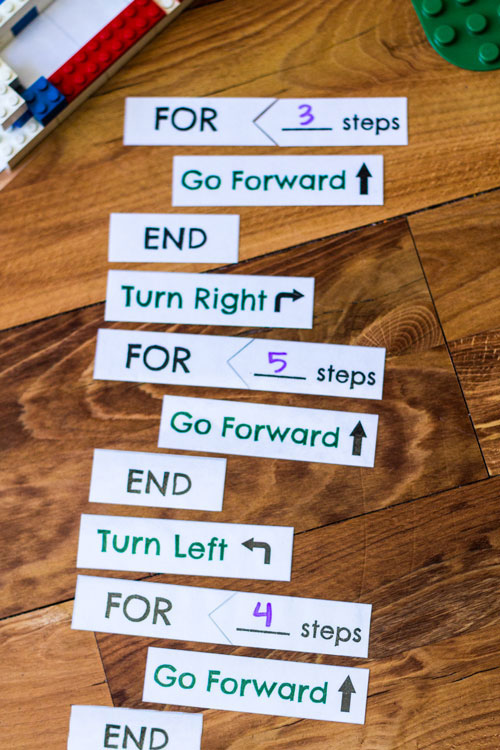
- Level 2: Once your child is good at Level 1, you can show them how they can use a loop that says “For ___ Steps” to do a command rather than just repeating the same card over and over. For the example above, the solution would look as shown. Notice that the command (or commands) inside a “for” loop are indented slightly. Not all coding languages are picky about this indent, but some are, and it makes the code more human readable anyway, so it’s a good habit to get in. At the end of the “for” loop, you place an “End” card to note where the loop ends. Again, not all programming languages require this “end” command, but many do.
- Level 3: This is definitely KS2 but eventually, once kids are able to think more abstractly, you can teach them about conditional “if” statements. Once I learned about if statements in college, I couldn’t stop applying them to my daily life. It basically felt like every decision could be summarized using one of these decision trees. For example, if I was trying to decide where to have dinner, I might think something like:“IF my friend Kelly is free,
—> then I will go get Thai food with her.
ELSE IF they are serving something edible at my dorm’s cafeteria,
—> then I’ll pick something up there.
ELSE
—> I will stay in my dorm room and have some cereal and ice cream.
END IF.”Thankfully, I grew out of that after I stopped spending tens of hours in the computer lab each week.Basically, when you are writing a program, you think about all the possibilities and evaluate what you should do in each case and in what order (or with what priority). For example, our character in a maze only faces a limited number of options. He may or may not have walls in front of him or to his left or to his right. However, there are so many possible codes that can be written based on these limited options. The child could decide to tell their person to follow this command: “If there is no wall in front of me, go forward. End.” That code alone will actually solve one of the provided mazes. For mazes that require turns, they may come up with something more like the code below.
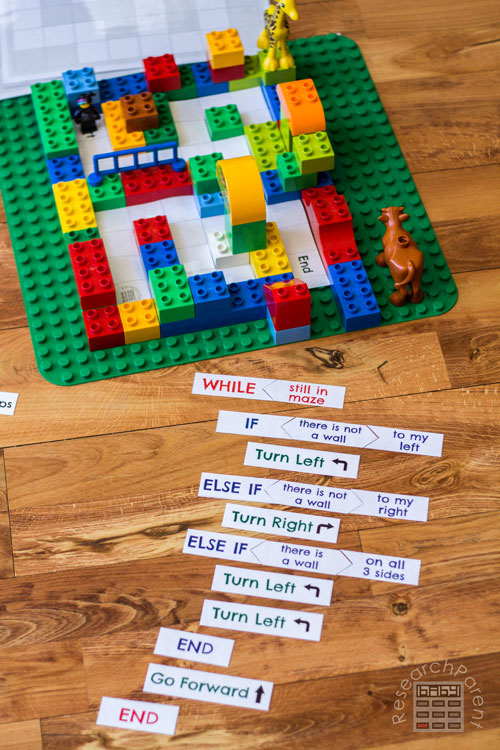
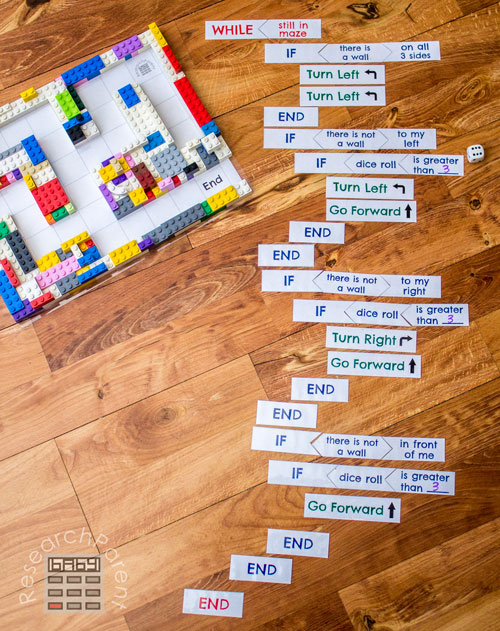
This code basically translates to the following instructions: “If I can turn left, turn left. Otherwise if I can turn right, turn right. Otherwise if I hit a dead end, turn around. After I’m done checking those conditions, go forward. Repeat.” The “repeat” comes from the red “while” loop around the whole code. By saying “While still in the maze (a bunch of code) End” what that means is keep repeating that (bunch of code) until you’re not in the maze anymore. I should also point out that one piece of code I didn’t use was ELSE. “IF” means definitely do this if the specified condition is true. “ELSE IF” means do this if the specified condition is true AND the “IF” and “ELSE IF”s that came before were not true. “ELSE” means do this if everything above has failed (like my cereal and ice cream dinner fall back). “END” means this is the end of the “if” statement (or “while” or “for” loop). - Level 4: If your child tries the above code (or their corresponding similarly structured code) on all the mazes provided, they will likely find that the code does not work on all mazes. In some cases, because of the priority given to that left turn (or whatever priority their code uses), their character will get stuck going back and forth over the same path repeatedly (an infinite loop). To solve this problem without introducing more complicated concepts like storing variables, a random number generator can be used to remove the priority of one choice over another. For example, instead of saying “If I can turn left, turn left,” I could instead say, “If I can turn left, turn left half of the time.” Since we are not ACTUALLY using computers, instead of using a random number generator function, your kids can just use a dice roll instead. By introducing this randomness, the character may not follow the most logical path to get out of the maze, but he will not get stuck doing the same thing over and over and over again. Here is an example of one possible code that I *think* will work for any maze. It is not the only “right” answer and probably not the best answer. I discourage you from showing your child my answer before they give it a shot on their own. Coding is a process of trial and error. Lots of testing is almost always required before programmers come up with something new that works.
Don’t forget to check out all the amazing posts in the 28 Days of Hands-On STEM Activities for lots more ideas to get your kids interested in these wonderful fields! If you thought this post was useful, please consider subscribing to my newsletter(and receive access to exclusive, free, educational printables)!
HAPPY “PROGRAMMING”!